lab05 : Turtle Graphics: Scene from a forest
| num | ready? | description | assigned | due |
|---|---|---|---|---|
| lab05 | true | Turtle Graphics: Scene from a forest | Fri 08/25 11:00AM | Fri 09/01 04:50PM |
Goal
The goal of this exercise is to draw a forest scene from basic shape primitives that you will implement using turtle graphics. The key idea to learn how to use functions as building blocks in more complex compositions. You will also learn about using repetition and randomization in your code to create interesting outcomes.
What you’ll be drawing
You’ll be writing functions to produce two basic shapes: a rectangle and a triangle. Each function takes parameters that specify the size, orientation, pen color, and fill color of that shape. This will allow us to create more interesting drawings later on. The function definitions are given below:
drawRectangle(width, height, tilt, penColor, fillColor)drawTriangle(base, height, tilt, penColor, fillColor)
The output produced when each function is callled with specific parameter values is shown in the following figure.
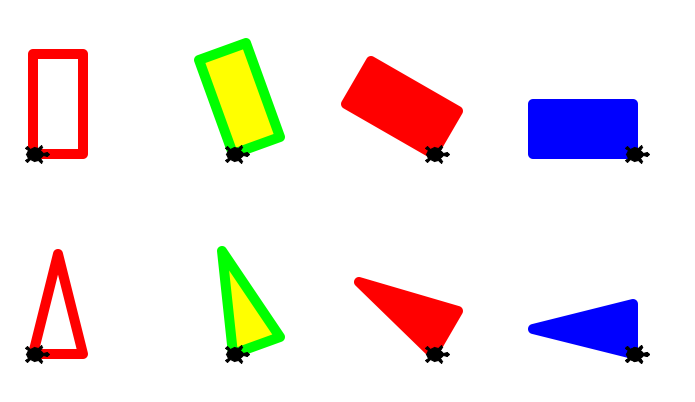
The above drawings are the result of calling either drawRectangle() or drawTriangle(). In each drawing, the turtle stamp shoes the initial location and heading of the turtle right before the corresponding function is called. For example the top left drawing is the output of the following line of code, when the turtle is at the top left corner:
drawRectangle( width = 50, height = 100, tilt = 0, penColor = "red", fillColor = "")
The subsequent three drawings on the same row are the output of repeatedly moving the turtle to the right, and calling the drawRectangle() function changing the tilt, penColor and fillColor. The function calls and parameter values to produce these drawings are given below:
drawRectangle( width = 50, height = 100, tilt = 20, penColor = "green", fillColor = "yellow")
...
drawRectangle( width = 50, height = 100, tilt = 60, penColor = "blue", fillColor = "blue")
...
drawRectangle( width = 50, height = 100, tilt = 90, penColor = "red", fillColor = "red")
Similarly, the drawings on the next row are the result of repeatedly calling drawTriangle() with the following parameter values:
base |
height |
tilt |
penColor |
fillColor |
|---|---|---|---|---|
| 50 | 100 | 0 | "red" |
"" |
| 50 | 100 | 20 | "green" |
"yellow" |
| 50 | 100 | 60 | "red" |
"red" |
| 50 | 100 | 90 | "blue" |
"blue" |
Once you have implemented the above basic shape primitives, you will use them as building blocks to create the following forest scene!
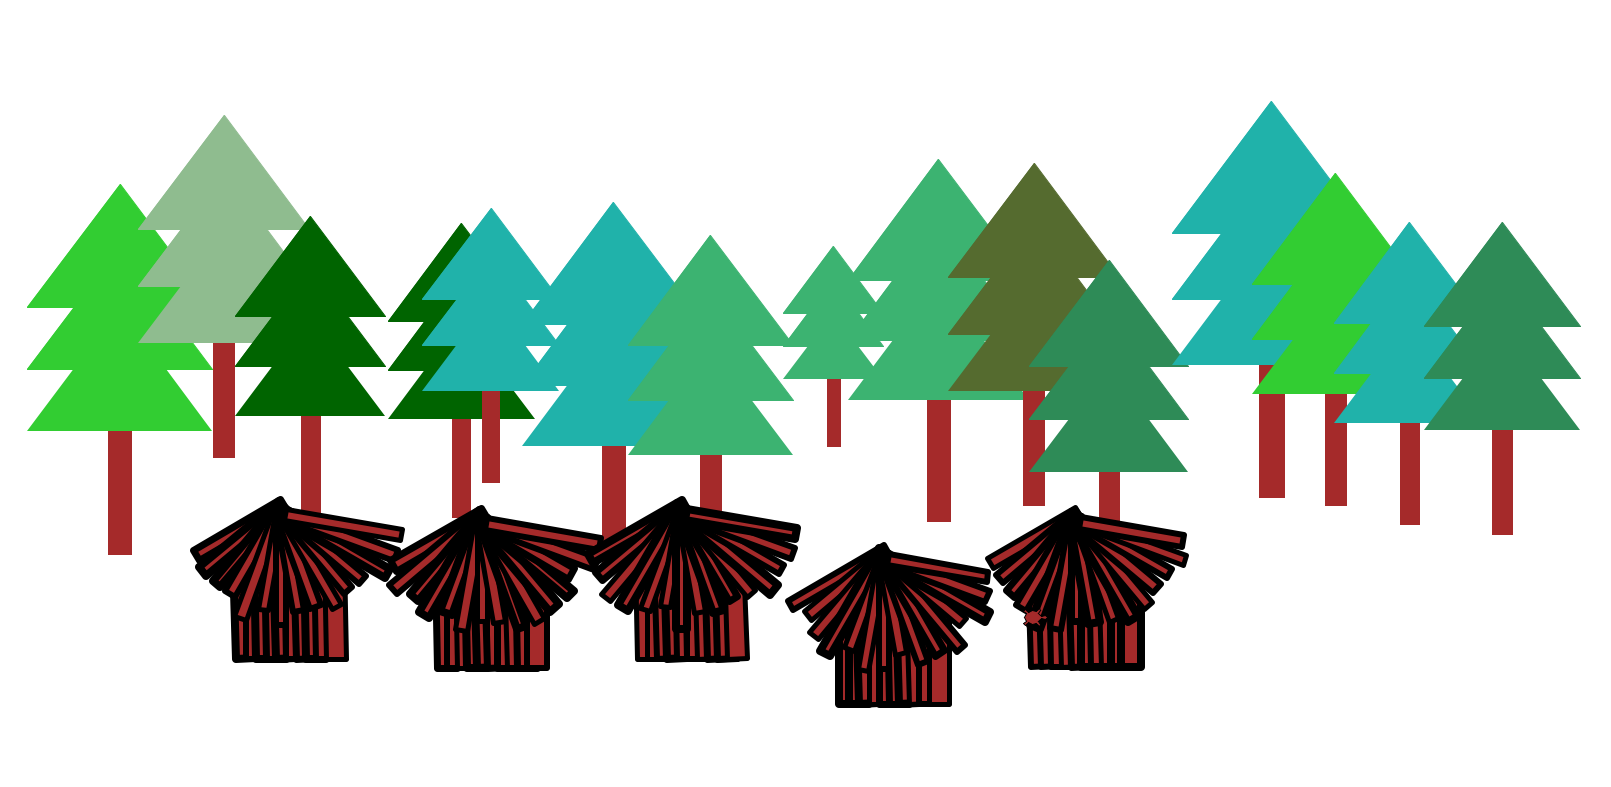
To create this scene you will implement additional functions to draw a tree, a hut, a forest and a village!
The programming part
Step 1: Create a lab05 directory under your cs8 directory
Create a directory called ~/cs8/lab05 for a file
we are going to call lab05.py.
If you don’t recall the commands, you may refer to any of the previous labs
Step 2: Open idle3 and create lab05.py
Open up idle3 and select the menu option File => New File to create a new file.
In this file, put this code (but put your name instead of “your name goes here”)
# lab05.py, your name goes here
import turtle
import math

if __name__=="__main__":
  t = turtle.Turtle()
The if test for __name__=="__main__": is where everthing in your program
should go except for:
importstatements- function definitions
I realize it’s a strange looking line of code—if you haven’t already
seen it before in lecture or another lab, you can find an explanation of it
here: All about if __name__=="__main__":.
You can name your turtle anything you like; I used t because it’s short to type.
Optionally, you can make your turtle look like a turtle by putting this line in your __main__ block also:
t.shape("turtle")
So the whole main block looks like this:
if __name__=="__main__":
  t = turtle.Turtle()
  t.shape("turtle")
Save this, and run it. You should see a turtle appear.
Step 3: Create and implement the functions for the basic shapes - rectangle and triangle
In your lab05.py file, write the skeleton of drawRectangle() and drawTriangle() as shown below. You will need some of the trigonometric functions provided in that math module to implement drawTriangle(). In order to use that module, add a line to import it at the top of the file. To learn more about the math module refer the Python documentation on the module and scroll down to the section on trigonometric functions.
import math

def drawRectangle(width, height, tilt, penColor, fillColor):
    """
    draw a rectangle with a given width, height, penColor and fillColor,
    with the current location of the turtle being the
    lower left corner, and the bottom side tilted by an angle tilt (specified in degrees)
    relative to the horizontal axis. Use a turtle called t to create the drawing
    """

    # Insert code to draw the rectangle

def drawTriangle(base, height, tilt, penColor, fillColor):
    """
    draw a triangle with a given base, height, penColor and fillColor,
    with the current location of the turtle being the
    lower left corner, and the bottom side tilted by an angle tilt (specified in degrees)
    relative to the horizontal axis. Use a turtle called t to create the drawing
    """

    # Insert code to draw the rectangle

def testRectangle():

    drawRectangle( 50, 100, 0, "red", "")

    # Move the turtle right by 200 units without leaving a trail
    t.seth(0)   # Set the absolute heading of the turtle to 0 degrees (pointing east)
    t.up()
    t.forward(200) # Move the turtle forward by 200 units
    t.down()

    drawRectangle( 50, 100, 20, "green", "yellow")

    # Move the turtle right by 200 units without leaving a trail
    t.seth(0)   # Set the absolute heading of the turtle to 0 degrees (pointing east)
    t.up()
    t.forward(200)
    t.down()


testRectangle()
-
Read the test code provided in testRectangle(). Refer to the turtle documentation to understand any commands that may be new to you. In particular, note that you can use the t.forward() command to move the turle forward relative to its current location in the direction that it is currently pointing. Similarly, the commands t.left() and t.right() rotate the turtle in the anticlockwise or clockwise directions respectively. These are commands that you may use as alternatives to the goto() command in your implementation of the drawRectangle() and drawTriangle() functions.
-
On a piece of paper draw the output that you expect to get for a correct implementaion of the drawRectangle() function, when the above code is executed. You may refer to the drawings and information on the top of this page.
-
Implement the drawRectangle() function and run your code until you get the expected output for the provided test code.
-
Add more test cases to the testRectangle() function until you arrive at a general enough implementation
-
Repeat the above process to implememt and test your drawTriangle() function.
With these basic primitives, you are now ready to make something more interesting! Refer back to the forest scene that you are working towards. Which functions do you think you should implement next? Try to write the definitions of these functions before reading the next section.
Step 4: Draw a tree
Now that we have our basic shapes (the rectangle and the triangle), we are in a position to create the essential elements of our forest scene in code - functions to draw a tree and a hut. Once we do that, drawing the forest boils down to making repeated calls to these two functions and moving the turtle to a new spot in between function calls. We’ll start with the tree because it has a more regular structure.
Define a ‘drawTree()’ function to draw a tree. A general ‘drawTree()’ function should allow the user to specify the height and color of the tree as captured in the following function definition.
def drawTree(height, color):

    '''
    This function draws a tree with a specific height and color, with the bottom of the bark at the current location of the turtle. The bark of the tree is always brown. All other parameters such as the width of the tree and the length of the bark are chosen so that the tree is well proportioned. The tree top is composed of three triangles stacked on top of each other.
    '''
Copy the above code and place it right after your implementation for drawTriangle. Now write a function testdrawTree() with some test code to test your implentation of drawTree(). Below is some initial test code:
def testdrawTree():
    t.up()
    t.goto(0,-400)
    t.down()
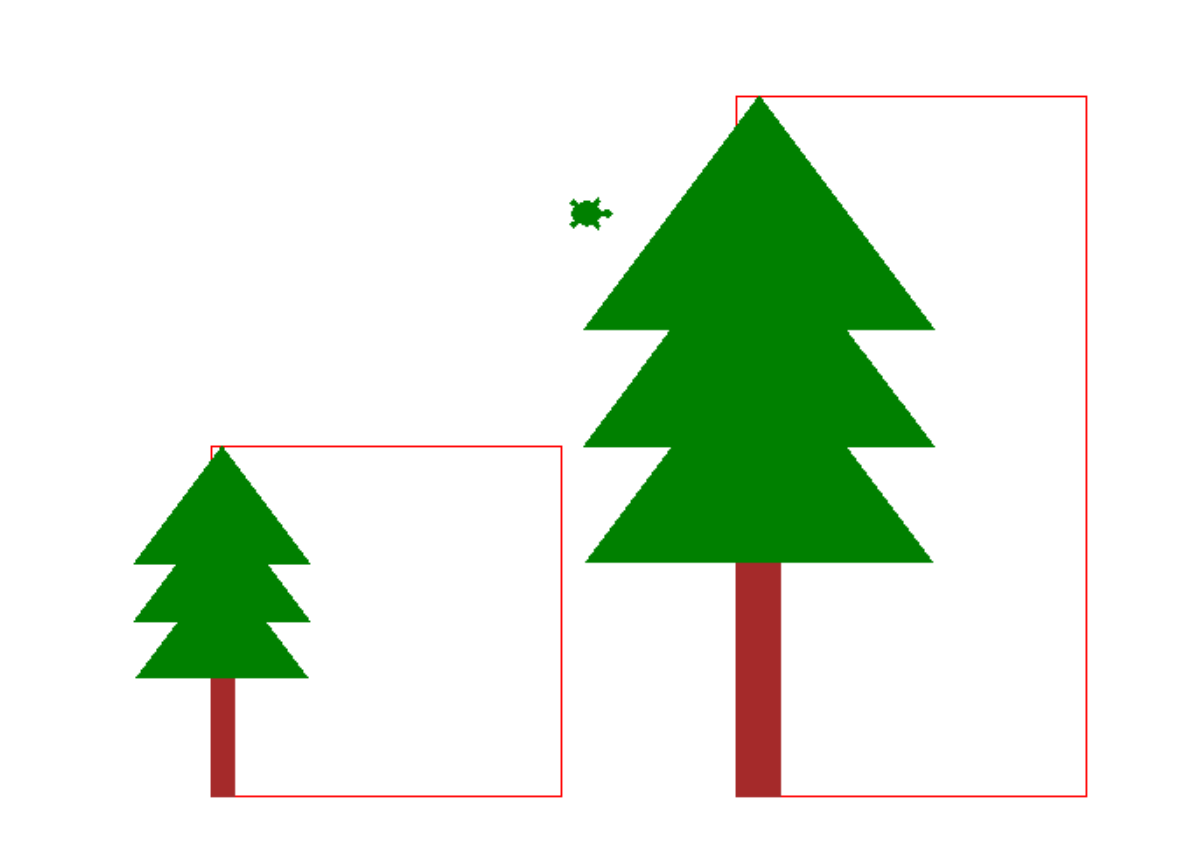
    drawRectangle(200, 200, 0 , "red","")
    drawTree(200, "green")
The above code helps you visually inspect if the your tree is of the specified height by drawing it alongside a rectangle of the same height. When you run this code with a correct implementation of drawTree() should see that the top of the tree coincides with the top side of the rectangle as shown in the following output:
Note that there are aspects of the tree that are not specified for you such as the width of the tree, the width and height of the bark, and the spacing between the three triangles that make up the tree top. You should make decisions on these aspects relative to the height of the tree so that a taller tree is wider and has a thicker and taller bark.
Now go ahead and implement your drawTree() function. Add more code to the testdrawTree() function to draw at least two well-proportioned trees of different heights at two different locations.
Step 5: Draw a row of trees - repetition made easy with loops
We would now like to go from drawing one tree to many trees, which will essentially become our forest. To begin define the function drawForest() as below:
def drawForest():
    '''
    Draws a collection of trees placed at random locations within a rectangular region
    '''
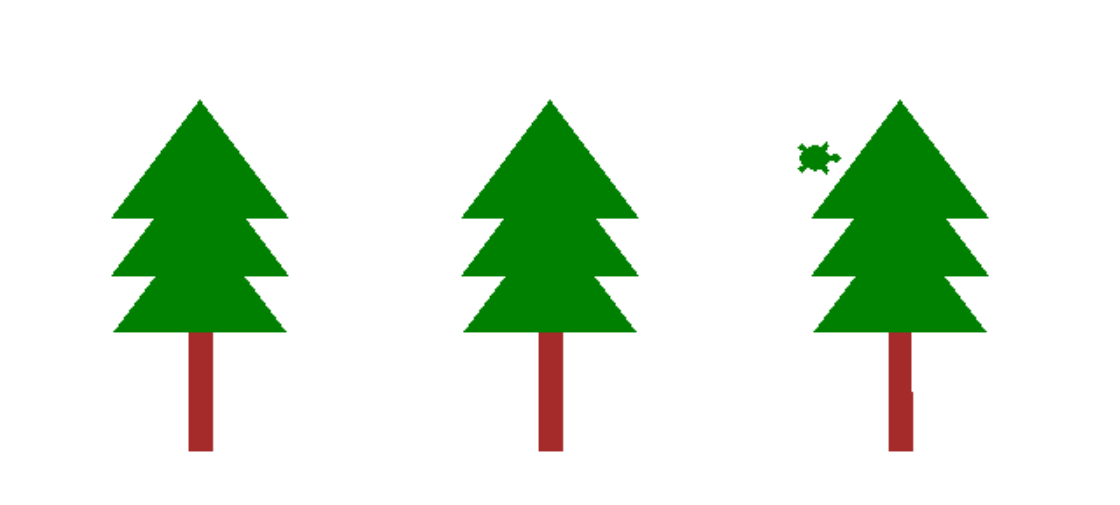
Start by drawing three trees of the same height in a row. One way of doing is this is to repeat a block of code to move the turtle to a specific spot and then call the drawTree() function as shown below:
# Move the turtle to location (-200, -100) and draw a tree
t.up()
t.goto(-200, -100)
t.down()
drawTree(200, "green")

# Move the turtle to location (0, -100) and draw another tree
t.up()
t.goto(0, -100)
t.down()
drawTree(200, "green")

# Move the turtle to location (200, -100) and draw the third tree
t.up()
t.goto(200, 100)
t.down()
drawTree(200, "green")
However a better way of doing the same thing is to use a for loop as demonstrated below:
for i in range(3):
    t.up()
    t.goto(400, -100)
    t.down()
    drawTree(200, "green")
The for loop runs the block of code inside it three times. Run it and you’ll find that the turtle draws all the three instances of the tree at the same spot. Modify exactly one of the lines to get the same output as the version above it. You should get an output similar to the one below:
Step 6: Take a detour into random numbers
In this step you will use the python random module to add an artistic touch to your drawings.
Although drawing all the trees in a straight line is a good first attempt at creating the forest, its not very realistic. So, your next goal is to place the trees at random locations that are roughly along a horizontal line. As a warm up try out the exercises below that demonstrate the use of the random module with the drawTriangle() function that you implemented earlier.
Start by writing a simple for loop to draw triangles along a circle. This code does not involve randomization.
def randomPlay():
    '''
    Experiments with the random module
    '''
    t.pensize(10)
    for i in range(36):
        t.up()
        radius = 200
        x = radius*math.cos(i*10*math.pi/180)
        y = radius*math.sin(i*10*math.pi/180)
        t.goto(x,y)
        t.down()
        tilt = 10*i
        drawTriangle(50, 50, tilt, "black", "red")

randomPlay()
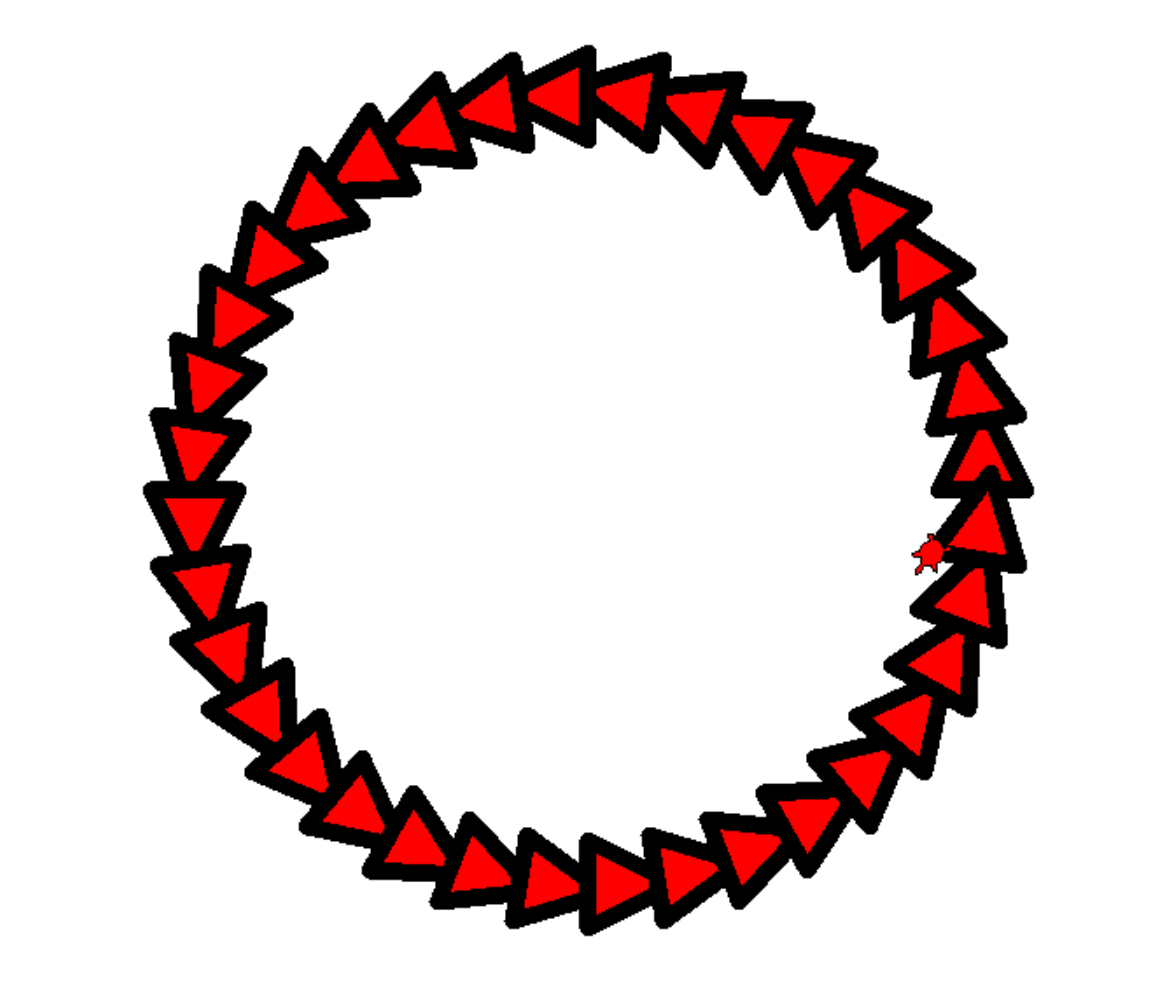
When you run the above code, you will find a very regular arrangement of triangles along a circle as shown below. Read the code to understand why its producing this output. Note that both the location and tilt of each triangle is dependent on the value of our loop variable (i).
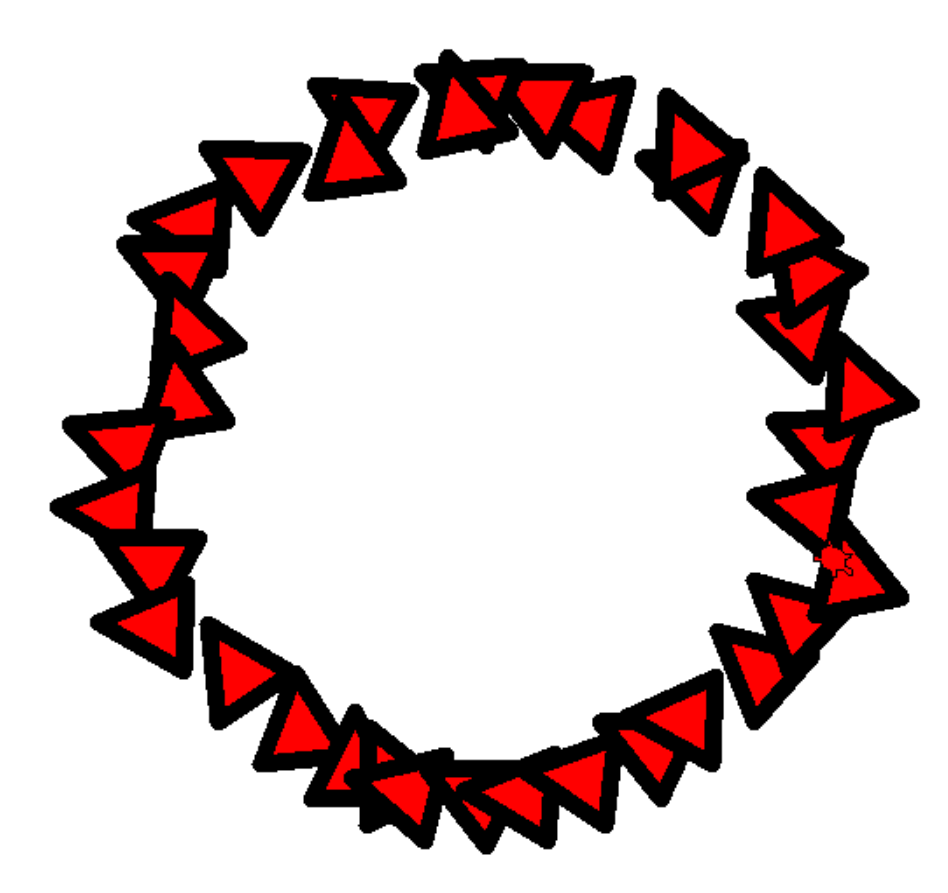
We will now introduce the use of random numbers into this code by selecting the tilt of each triangle to be a random number between 0 and 90 degrees. To do this replace the line tilt = 10*i by tilt = random.randint(0, 90). Then run the code. You should see a drawing similar to the one below, although not exactly the same!
We will next use the random module to randomize two other aspects of our drawing: the location of each triangle and its color. Previously, we drew all our triangles along a circle of radius 200. This time we will introduce a small random perturbation in that value by adding a random number between -50 and 50 to the radius in every iteration of the for loop. The line of code that does that is:
radius = 200 + random.randint(-50, 50)
The second modification we will make is to select the color of each triangle at random from a list of colors. The following two lines of code defines our color choices and then selects one color from this list at random.
shadesOfGreen =["#006400", "#556b2f", "#8fbc8f", "#2e8b57", "#3cb371", "#20b2aa", "#32cd32"]
color = random.choice(shadesOfGreen)
The list shadesOfGreen defines a list of color codes for different shades of green. The next line selects one of the elements of this list at random. The following code incorporates these new elements.
def randomPlay():
    '''
    Experiments with the random module
    '''
    shadesOfGreen =["#006400", "#556b2f", "#8fbc8f", "#2e8b57", "#3cb371", "#20b2aa", "#32cd32"]

    t.pensize(10)
    for i in range(36):
        t.up()
        radius = 200 + random.randint(-50, 50)
        x = radius*math.cos(i*10*math.pi/180)
        y = radius*math.sin(i*10*math.pi/180)
        t.goto(x,y)
        t.down()
        tilt = 0
        color = random.choice(shadesOfGreen)
        drawTriangle(50, 50, tilt, "black", color)
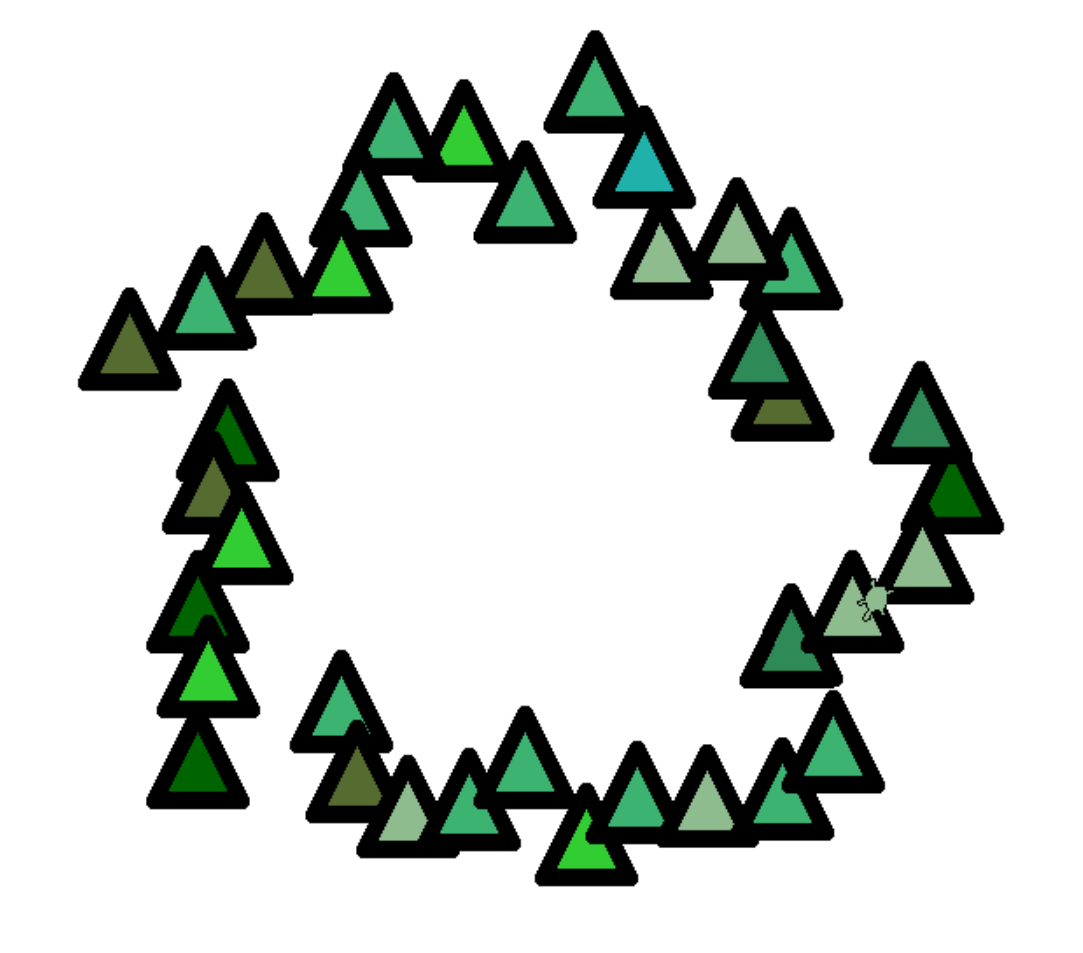
The output of the code is shown in the figure below. Try changing the limits to the random.randint() function and rerun the code, and observe the outcome. Notice how you can control the level of randomness in your drawings using this simple strategy.
Apply what you have learned in this section to complete your drawForest() function. Your forest should contain anywhere between 10 and 15 trees of different sizes and different shades of green placed randomly along a horizontal line.
Step 7: Draw a hut, then a village
Define a function to draw a hut with fixed dimensions, composed of only rectangles.
def drawHut():
    '''
    Draw a brown hut of fixed dimensions purely composed of rectangles
    Use the random module to enhance your drawing by introducing irregularilities in a controlled way
    '''


def drawVillage():
    '''
    Draw a sequence of five huts, placed randomly along a horizontal line
    '''
When testing these functions, comment out all calls to previous functions. This will help you focus on the elements of interest in your drawing.
Step 8: Put it all together
Finally, put all the elements that you have implemented to draw the final scene. When you are finished, ask a TA or instructor to look it over and give you some feedback on it.
It should be structured in a way that there is
- A single file called lab05.py
- Code at the top of the lab05.py file that sets up a turtle
- Next, function defintions for each of the basic shapes, test code for the basic shapes,
drawTree(),testdrawTree(),drawForest(),drawHut(), anddrawVillage() - Finally, code that calls those functions to draw the forest scene. That code should be in a block that starts with
if __name__=="__main__":as explained later in the lab.
If your code meets all those criteria, you should be in good shape to submit it.
Step 9: Submitting via submit.cs
Note that this week, although we are using submit.cs, it is NOT the case that the grade you get from submit.cs is your final grade for the assignment.
The grade on submit.cs is just a PART of your grade–you will get 10 points for basically submitting anything that is a valid Python program that has the name lab05.py.
However, the other 90 points for this lab will come from an instructor or TA doing a manual inspection of your code to see if it complies with the requirements listed above.
If you want reassurance that your code is in good shape, you may ask a TA or instructor to look it over during office hours or lab.
To submit your code, use:
Navigate to the page for submitting lab05
The page for submitting lab05 is here: https://submit.cs.ucsb.edu/form/project/774/submission
Navigate to that page, and upload your lab05.py file.
If you are working on the ECI/CSIL/lab linux systems, you can also submit at the command line with this command:
~submit/submit ~/cs8/lab05/lab05.py
It will ask for your email address: use your full umail address (e.g. cgaucho@umail.ucsb.edu). For password, use the password that you enter for the submit.cs system. You may save these credentials if you don’t want to have to type them in every time.
Note that if you try to upload a file with a name that does not match EXACTLY the name lab05.py, the system will not allow you to do it.
Once you upload it, you should get a page that shows your submission is pending.
Refresh that page, and you should get one that indicates with either red, or green, whether the test cases for your code passed or failed.
If you got all green, and 10 points, then your submission was accepted—but to emphasize, for this week, the other 90 points will be assigned by a human grader. You’ll be notified of that grade via Gauchospace.
Created by Diba Mirza