lab01 : Turtle Graphics: your initials and graduation year
| num | ready? | description | assigned | due |
|---|---|---|---|---|
| lab01 | true | Turtle Graphics: your initials and graduation year | Thu 08/10 09:30AM | Fri 08/18 04:50PM |
Goal
The goal of this exercise is to practice with Turtle Graphics in Python by producing somewhere between two and four Python functions that use Turtle Graphics to make particular shapes.
(You’ll understand the reasons its “between three and six” in a minute.)
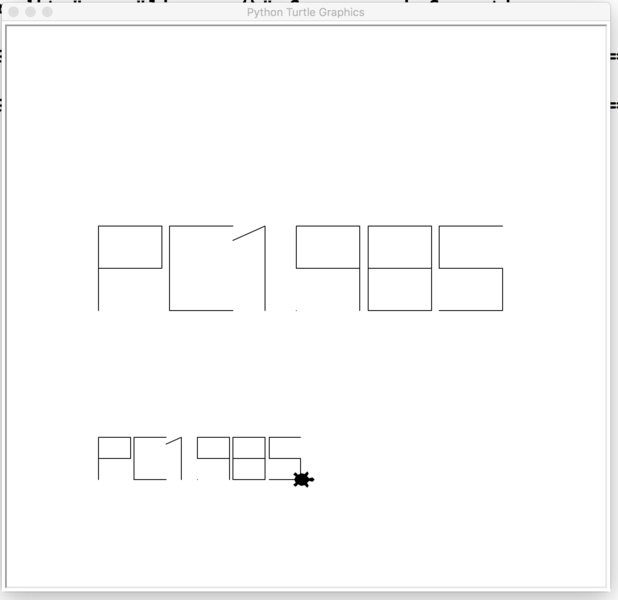
What you’ll be drawing
You’ll be drawing functions to produce your initials, and the year you expect to graduate from UCSB. For example, if your name is Pat Brady and you expect to graduate in 2021, you’ll write these five functions:
drawP(width, height)drawB(width, height)draw2(width, height)draw0(width, height)draw1(width, height)
You’ll use the draw2 function twice, since the 2 appears twice in 2021
If your name is Chris Carillo, and you are graduating in 2020, you’ll only need three functions:
drawC(width, height)draw2(width, height)draw0(width, height)
As you can figure out by now, “Phill Conrad” graduating in 2017 would need six functions.
Of course, there is nothing stopping you from making more functions if you want to, just for practice. (And I encourage you to do so!)
You’ll also include function calls that use your functions to put your initials and graduation year across the screen twice at two different sizes: once at the top, and once at the bottom, like this:
Your first step is to plan our your letters.
To do that, we have a worksheet, IC00 for you to complete.
Start on that first, then refresh this page for more instructions.
The programming part
Step 1: Create a lab01 directory under your cs8 directory
In lab00 you created a directory ~/cs8/lab00 and, if
you followed the instructions to the letter, your hello.py file
is located in that directory.
You should now create a directory called ~/cs8/lab01 for a file
we are going to call lab01.py.
To do that, use the commands below.
(Just like last week, your prompt may not be exactly like the one shown here. Instead of -bash-4.2$ , you might have something like [cgaucho@cstl-15 ~]$ . The cgaucho here is your username, the cstl-15 is where you are logged in, and the ~ is your current directory. Don’t be distracted by this detail.)
-bash-4.2$ cd
-bash-4.2$ pwd
/cs/student/yourusername
-bash-4.2$ cd cs8
-bash-4.2$ pwd
/cs/student/yourusername/cs8
-bash-4.2$ mkdir lab01
-bash-4.2$ cd lab01
-bash-4.2$ pwd
/cs/student/yourusername/cs8/lab01
-bash-4.2$
Step 2: Open idle3 and create lab01.py
Open up idle3 and select the menu option File => New File to create a new file.
In this file, put this code (but put your name instead of “your name goes here”)
# lab01.py, your name goes here
import turtle

t = turtle.Turtle()
You can name your turtle anything you like; I used t because it’s short to type.
Optionally, you can make your turtle look like a turtle by typing this:
t.shape("turtle")
Save this, and run it. You should see a turtle appear.
Step 3: Create a function for your first letter
Next, you are going to define a function to draw your first letter.
Name this function drawX, where X is the letter you are drawing
for your first initial. (For example, drawA, drawB, etc.)
As a model, use the code below for the drawA function. This goes
right after the code you just put into the lab01.py file.
For your draw function, adapt this code, using the points you defined on the ic00 worksheet, and change the code that connects the points with lines as needed.
After entering the function definition, at the bottom try a sample
function call with some width and height (e.g. drawA(50,100)). The
function call should NOT be indented, just as shown in the example below.
Try running it and see if the letter looks ok. Make changes until you see that it can draw the letter properly.
def drawA(width, height):
    """
    draw the letter A with a given width and height,
    with the current location being the lower left corner of the A
    using a turtle called t
    """

    # figure out where we are

    startX = t.xcor()
    startY = t.ycor()

    # figure out the other points using only what we know,
    # which is width, height, startX and startY

    topAX = startX + (width/2)
    topAY = startY + height

    bottomRightX = startX + width
    bottomRightY = startY

    barLeftX = startX + width/4
    barLeftY = startY + height/2

    barRightX = startX + (width/4) + (width/2)
    barRightY = startY + height/2

    # draw left hand side of the A (assumes we start at startX,startY)

    t.goto(topAX,topAY)

    # draw the right side of the A

    t.goto(bottomRightX, bottomRightY)

    # draw bar across the middle

    t.up()
    t.goto(barLeftX,barLeftY)
    t.down()
    t.goto(barRightX,barRightY)

    # leave turtle at lower right hand corner of letter

    t.up()
    t.goto(bottomRightX,bottomRightY)
    t.down()

drawA(50,100)
Step 4: Make sure first letter function is reusable
Now, we want to make sure your function is general enough to be able to draw your letter:
- at different places on the screen
- at different heights and widths
To make sure that you can draw your first letter at two different places, change the function call at the bottom of the file from something like this:
drawA(50,100)
to something like this, that draws an A of width 50 and height 100, picks up the pen and moves to a new location, and then draws the A again with a different width and height.
drawA(50,100)

# a new line
t.up()
t.goto(-200,-200)
t.down()

drawA(40,80)
If your code is written in a general way, i.e. the drawA routine works ONLY with the startX, startY, width, and height values, both letters should look good. If one of them looks incorrect, then see if you can determine what is wrong with your code.
When you see two good drawings of your first letter, you are ready for the next step.
Step 5: Add the function for the next letter or number
Now we are going to add another function just like the first, right under it.
Keep the code that has the actual function calls at the bottom of the file. The order should be:
- First, the code that imports and sets up the turtle, i.e.
import turtle t = turtle.Turtle() t.shape("turtle") - Second, the functions definitions for
drawA,drawX, etc., e.g.def drawA(width,height): startX = t.xcor() startY = t.ycor() # etc.. def drawX(width,height): # code for drawX is here, indented... -
Then, last, the section of code with function calls that draw your letters
 drawA(50,100)

 # a new line
 t.up()
 t.goto(-200,-200)
 t.down()

 drawA(40,80)
 # etc ...
Try running the code again after adding the function definition for your new letter (e.g. def drawX(width,height): .... Make sure you don’t get any error messages—if you do, fix those before continuing.
Then, we’ll try adding in code to call the function for your second letter, for example drawX(100,200). We probably want to move the turtle over a bit before drawing the second letter. We can do that with with t.forward() or another t.goto() with some numbers, as shown in the two options below.
| Before |
After (using t.forward())
|
After (using t.goto())
|
|---|---|---|
|
|
|
Step 6: Continue adding letters and numbers one by one
Continue adding letters and numbers one by one until you have two rows at different sizes, just like in the example.
When you are finished, ask a TA or instructor to look it over and give you some feedback on it.
It should be structured in a way that there is
- A single file called
lab01.py - Code at the top of the
lab01.pyfile that sets up a turtle - Next, function defintions for each of the letters and digits that you draw, each of which takes
widthandheightas parameters, e.g.def drawP(width,height): ... def drawC(width,height): ... def draw2(width,height): ... # etc - Finally, code that calls those functions to draw your initials and graduation year all in a line
- And then, code that draws all those letters and digits a second time, at a different size by calling your functions again.
If you code meets all those criteria, you should be in good shape to submit it.
Step 7: Submitting via submit.cs
Note that this week, although we are using submit.cs, it is NOT the case that the grade you get from submit.cs is your final grade for the assignment. The grade on submit.cs is just a PART of your grade–you will get 10 points for basically submitting anything that is a valid Python program that has the name lab01.py. However, the other 90 points for this lab will come from an instructor or TA doing a manual inspection of your code to see if it complies with the requirements listed above.
If you want reassurance that your code is in good shape, you may ask a TA or instructor to look it over during office hours or lab.
To submit your code, use:
Navigate to the page for submitting lab00
The page for submitting lab00 is here: https://submit.cs.ucsb.edu/form/project/768/submission
Navigate to that page, and upload your hello.py file.
If you are working on the ECI/CSIL/lab linux systems, you can also submit at the command line with this command:
~submit/submit -p 768 ~/cs8/lab01/lab01.py
It will ask for your email address: use your full umail address (e.g. cgaucho@umail.ucsb.edu). For password, use the password that you enter for the submit.cs system. You may save these credentials if you don’t want to have to type them in every time.
Note that if you try to upload a file with a name that does not match EXACTLY the name lab01.py, the system will not allow you to do it.
Once you upload it, you should get a page that shows your submission is pending.
Refresh that page, and you should get one that indicates with either red, or green, whether the test cases for your code passed or failed.
If you got all green, and 10 points, then your submission was accepted—but to emphasize, for this week, the other 90 points will be assigned by a human grader. You’ll be notified of that grade via Gauchospace.